이번 스터디에서는 예전 스터디에서 테스트해봤던 ArgoCD 기본 동작외에 추가로 실제 운영에서 사용할만한 ArgoCD의 구성 및 기능에 대해서 테스트해보았다.
ArgoCD 실습환경
이전과 동일하게 Windows 11의 WSL2를 통해서 Ubuntu 24.04를 실행하고 Kind를 통해서 구성하였다.
Kind 구성
Host에서 접근할 NodePort를 30000~30003으로 미리 할당해 열어두고 Worker Node를 3개 더 추가한다.
kind create cluster --name ersia --image kindest/node:v1.32.8 --config - <<EOF
kind: Cluster
apiVersion: kind.x-k8s.io/v1alpha4
nodes:
- role: control-plane
  extraPortMappings:
  - containerPort: 30000
    hostPort: 30000
  - containerPort: 30001
    hostPort: 30001
  - containerPort: 30002
    hostPort: 30002
  - containerPort: 30003
    hostPort: 30003
- role: worker
- role: worker
- role: worker
EOF

(⎈|kind-ersia:N/A) root@DESKTOP-O4EPQ9T:~# kubectl cluster-info --context kind-ersia
Kubernetes control plane is running at https://127.0.0.1:33709
CoreDNS is running at https://127.0.0.1:33709/api/v1/namespaces/kube-system/services/kube-dns:dns/proxy

To further debug and diagnose cluster problems, use 'kubectl cluster-info dump'.Node와 Pod의 상태를 좀 더 직관적으로 보기위한 kube-ops-view 설치 후 http://127.0.0.1:30001로 접속, 모니터링 화면이 작다면 scale옵션을 추가해 확대할 수 있다.
helm repo add geek-cookbook https://geek-cookbook.github.io/charts/
helm install kube-ops-view geek-cookbook/kube-ops-view --version 1.2.2 \
  --set service.main.type=NodePort,service.main.ports.http.nodePort=30001 \
  --set env.TZ="Asia/Seoul" --namespace kube-system

  http://127.0.0.1:30001/#scale=1.5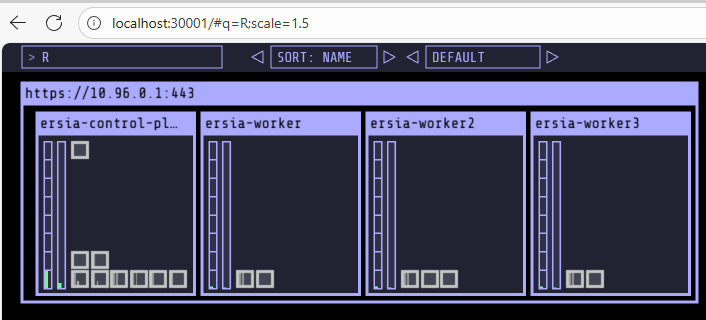
ArgoCD 설치
kubectl create ns argocd

cat <<'EOF' > argocd-values.yaml
server:
  service:
    type: NodePort
    nodePortHttps: 30002
  extraArgs:
    - --insecure  # HTTPS 대신 HTTP 사용 (로컬,개발 테스트용으로만 사용할 것이므로)
EOF

helm repo add argo https://argoproj.github.io/argo-helm
helm repo update
helm install argocd argo/argo-cd --version 9.0.5 -f argocd-values.yaml --namespace argocd


(⎈|kind-ersia:N/A) root@DESKTOP-O4EPQ9T:~# kubectl -n argocd get pod,svc
NAME                                                   READY   STATUS              RESTARTS   AGE
pod/argocd-application-controller-0                    1/1     Running             0          48s
pod/argocd-applicationset-controller-bbff79c6f-hzjq4   1/1     Running             0          48s
pod/argocd-dex-server-6877ddf4f8-cftwt                 0/1     Init:0/1            0          48s
pod/argocd-notifications-controller-7b5658fc47-hpfhw   1/1     Running             0          48s
pod/argocd-redis-7d948674-zmzkz                        1/1     Running             0          48s
pod/argocd-redis-secret-init-mk5kw                     0/1     Completed           0          79s
pod/argocd-repo-server-7679dc55f5-vz62b                0/1     Init:0/1            0          48s
pod/argocd-server-787fb5f956-r79gn                     0/1     ContainerCreating   0          48s

NAME                                       TYPE        CLUSTER-IP     EXTERNAL-IP   PORT(S)                      AGE
service/argocd-applicationset-controller   ClusterIP   10.96.110.27   <none>        7000/TCP                     48s
service/argocd-dex-server                  ClusterIP   10.96.184.73   <none>        5556/TCP,5557/TCP            48s
service/argocd-redis                       ClusterIP   10.96.46.217   <none>        6379/TCP                     48s
service/argocd-repo-server                 ClusterIP   10.96.168.14   <none>        8081/TCP                     48s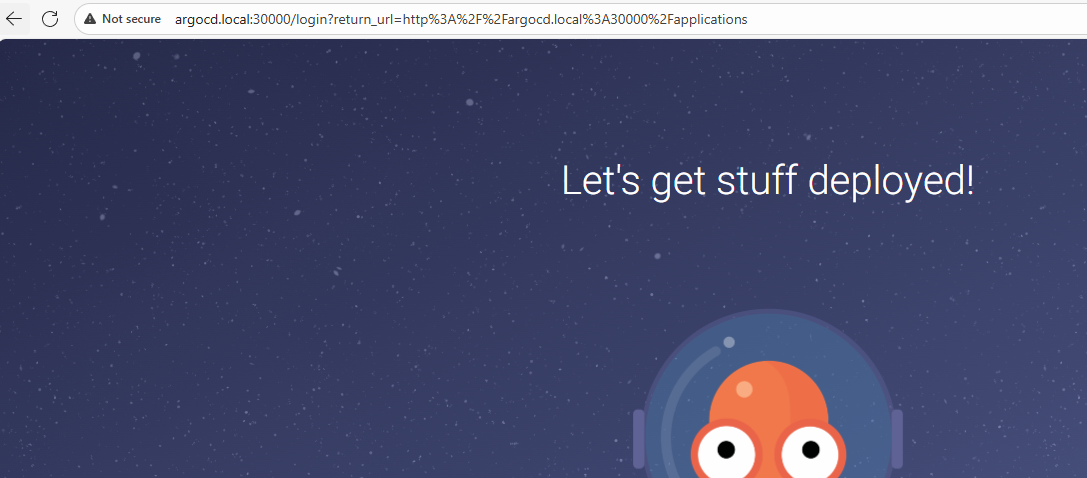
service/argocd-server NodePort 10.96.64.178 <none> 80:30080/TCP,443:30002/TCP 48shttp://127.0.0.1:30002 로 접속하면 아래와 같이 ArgoCD 초기 화면을 확인

초기 패스워드는 아래의 명령어로 확인 후 admin / <초기패스워드> 로 접속
kubectl -n argocd get secret argocd-initial-admin-secret -o jsonpath="{.data.password}" | base64 -d ;echo
Ingress-nginx 구성
Ingress-nginx로 ArgoCD 서비스에 접근할 수 있도록 구성하기 위해 http 접속만 30000포트를 내부 80에 연결해 설정한다.
helm repo add ingress-nginx https://kubernetes.github.io/ingress-nginx
helm repo update
helm upgrade --install ingress-nginx ingress-nginx/ingress-nginx \
  --set controller.service.type=NodePort \
  --set controller.service.nodePorts.http=30000 \
  --namespace ingress-nginx --create-namespace

(⎈|kind-ersia:N/A) root@DESKTOP-O4EPQ9T:~# kubectl -n ingress-nginx get svc ingress-nginx-controller
NAME                       TYPE       CLUSTER-IP      EXTERNAL-IP   PORT(S)                      AGE
ingress-nginx-controller NodePort 10.96.154.105 <none> 80:30000/TCP,443:32480/TCP 14mArgoCD에 Ingress 적용
cat <<'EOF' > argocd-ingress.yaml
apiVersion: networking.k8s.io/v1
kind: Ingress
metadata:
  name: argocd-ingress
  namespace: argocd
  annotations:
    nginx.ingress.kubernetes.io/ssl-redirect: "false"  # HTTP 유지
spec:
  ingressClassName: nginx
  rules:
  - host: argocd.local
    http:
      paths:
      - path: /
        pathType: Prefix
        backend:
          service:
            name: argocd-server
            port:
              number: 80
EOF

kubectl apply -f argocd-ingress.yaml적용 후 http://127.0.0.1:30000/ 로는 접속이 안되지만 http://argocd.local:30000 으로는 접속이 된다.
PS C:\Users\user> curl -I -H "Host: argocd.local" http://127.0.0.1:30000/
HTTP/1.1 200 OK
Date: Sat, 08 Nov 2025 17:02:47 GMT
Content-Type: text/html; charset=utf-8
Content-Length: 788
Connection: keep-alive
Accept-Ranges: bytes
Content-Security-Policy: frame-ancestors 'self';
Vary: Accept-Encoding
X-Frame-Options: sameorigin
X-Xss-Protection: 1실제 도메인 연결까지는 다소 귀찮으니 C:\Windows\System32\drivers\etc\hosts에 아래의 설정을 추가한다.
# 관리자모드로 켠 메모장으로 아래 내용 추가
127.0.0.1 argocd.local그 이후 브라우저에서 http://argocd.local:30000 로 접속해 확
Github 저장소와 연결해 GitOps 동작 확인
테스트를 위한 github 저장소 생성 및 간단한 nginx 배포 구성
# git 저장소 초기화
mkdir -p ~/work/argocd-lab && cd ~/work/argocd-lab
git init
git config user.name "<test-name>"
git config user.email "<test-email>"

# nginx 배포
mkdir -p manifests/nginx
cat <<'EOF' > manifests/nginx/deployment.yaml
apiVersion: apps/v1
kind: Deployment
metadata:
  name: nginx
  labels:
    app: nginx
spec:
  replicas: 1
  selector: { matchLabels: { app: nginx } }
  template:
    metadata:
      labels: { app: nginx }
    spec:
      containers:
      - name: nginx
        image: nginx:1.25
        ports:
        - containerPort: 80
EOF

cat <<'EOF' > manifests/nginx/service.yaml
apiVersion: v1
kind: Service
metadata:
  name: nginx
  labels:
    app: nginx
spec:
  type: ClusterIP
  selector:
    app: nginx
  ports:
  - name: http
    port: 80
    targetPort: 80
EOF

(⎈|kind-ersia:N/A) root@DESKTOP-O4EPQ9T:~/work/argocd-lab# tree manifests/
manifests/
└── nginx
    ├── deployment.yaml
    └── service.yaml

2 directories, 2 files

# Git commit
git add .
git commit -m "feat: base nginx app (replicas=1)"# 미리 생성해두었던 github 저장소와 연결
git remote add origin https://github.com/<GITHUB_USER>/<REPO>.git
# 원격 저장소(github)에 push
git branch -M main
git push -u origin mainArgoCD가 Github 저장소의 코드를 반영하도록 설정
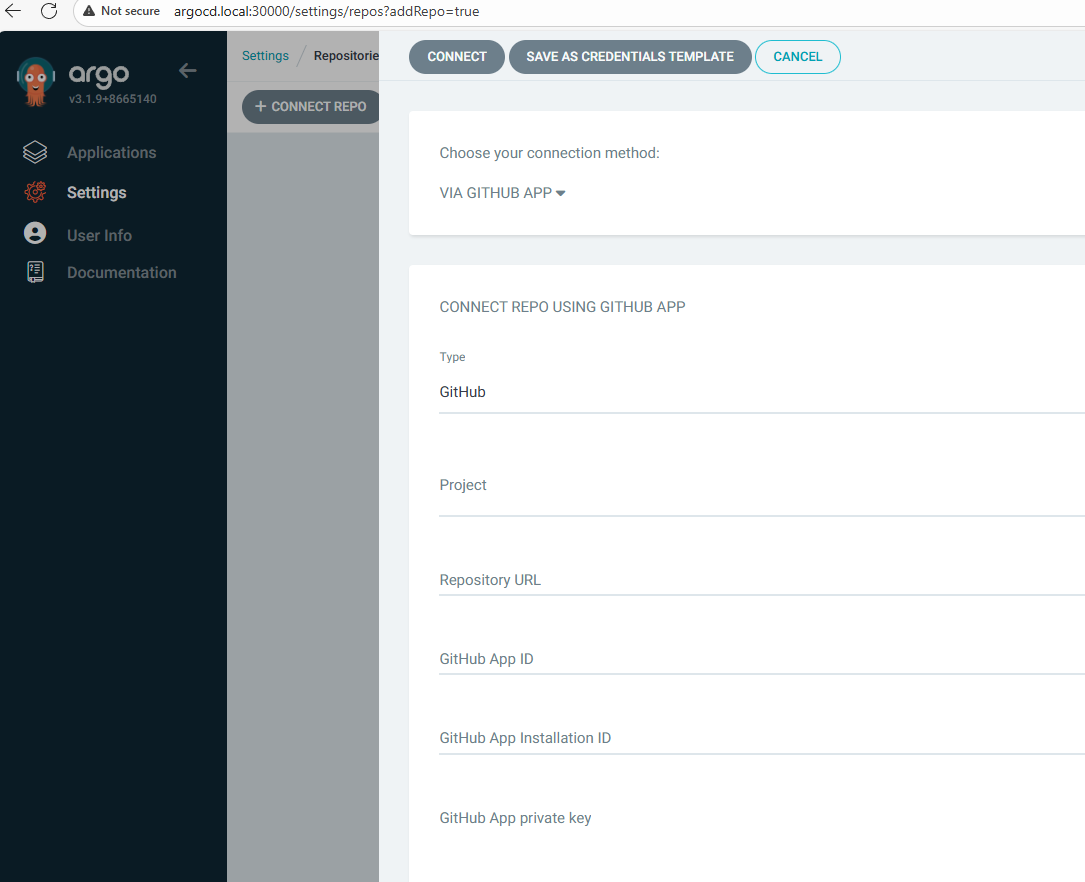
먼저 ArgoCD에서 Github 저장소에 접근할 수 있도록 인증 정보를 추가해야한다. 추가 방법은 ArgoCD 웹화면에서 추가해줄 수도 있고, ArgoCD CLI 명령어를 통해서도 가능하다.
VERSION=$(curl -s https://api.github.com/repos/argoproj/argo-cd/releases/latest | grep tag_name | cut -d '"' -f 4)

curl -sSL -o argocd-linux-amd64 https://github.com/argoproj/argo-cd/releases/download/${VERSION}/argocd-linux-amd64
sudo install -m 555 argocd-linux-amd64 /usr/local/bin/argocd
rm argocd-linux-amd64


(⎈|kind-ersia:N/A) root@DESKTOP-O4EPQ9T:~/work/argocd-lab# argocd version --client

argocd: v3.2.0+66b2f30
  BuildDate: 2025-11-04T15:21:01Z
  GitCommit: 66b2f302d91a42cc151808da0eec0846bbe1062c
  GitTreeState: clean
  GoVersion: go1.25.0
  Compiler: gc
  Platform: linux/amd64

# 명령어로 인증 정보 입력
argocd login argocd.local:30000 --username admin --password <ArgoCD패스워드> --insecure

WARNING: server is not configured with TLS. Proceed (y/n)? y
{"level":"warning","msg":"Failed to invoke grpc call. Use flag --grpc-web in grpc calls. To avoid this warning message, use flag --grpc-web.","time":"2025-11-09T02:50:24+09:00"}
'admin:login' logged in successfully
Context 'argocd.local:30000' updated

# Private 리포 등록 (토큰 인증)
argocd repo add https://github.com/<GITHUB_USER>/<REPO>.git \
  --username <GITHUB_USER> \
--password <GITHUB_TOKEN>아래 구성을 추가해 ArgoCD가 저장소에서 yaml을 읽어 자동 배포하도록 설정한다.
kubectl create namespace demo || true

# Application manifest
# Github 관련 정보는 개인 설정에 맞춰 수정
cat <<'EOF' > app-nginx.yaml
apiVersion: argoproj.io/v1alpha1
kind: Application
metadata:
  name: nginx-app
  namespace: argocd
spec:
  project: default
  source:
    repoURL: https://github.com/<GITHUB_USER>/<REPO>.git
    targetRevision: main
    path: manifests/nginx
  destination:
    server: https://kubernetes.default.svc
    namespace: demo
  syncPolicy:
    automated:
      prune: true
      selfHeal: true
EOF

kubectl apply -f app-nginx.yaml

# 상태 확인
(⎈|kind-ersia:N/A) root@DESKTOP-O4EPQ9T:~/work/argocd-lab# argocd app list
{"level":"warning","msg":"Failed to invoke grpc call. Use flag --grpc-web in grpc calls. To avoid this warning message, use flag --grpc-web.","time":"2025-11-09T02:53:40+09:00"}
NAME              CLUSTER                         NAMESPACE  PROJECT  STATUS  HEALTH       SYNCPOLICY  CONDITIONS  REPO                                         PATH             TARGET
argocd/nginx-app  https://kubernetes.default.svc  demo       default  Synced  Progressing  Auto-Prune  <none>      https://github.com/ErsiaJin/argocd-test.git  manifests/nginx  main

(⎈|kind-ersia:N/A) root@DESKTOP-O4EPQ9T:~/work/argocd-lab# argocd app get nginx-app
{"level":"warning","msg":"Failed to invoke grpc call. Use flag --grpc-web in grpc calls. To avoid this warning message, use flag --grpc-web.","time":"2025-11-09T02:53:45+09:00"}
{"level":"warning","msg":"Failed to invoke grpc call. Use flag --grpc-web in grpc calls. To avoid this warning message, use flag --grpc-web.","time":"2025-11-09T02:53:46+09:00"}
Name:               argocd/nginx-app
Project:            default
Server:             https://kubernetes.default.svc
Namespace:          demo
URL:                https://argocd.example.com/applications/nginx-app
Source:
- Repo:             https://github.com/ErsiaJin/argocd-test.git
  Target:           main
  Path:             manifests/nginx
SyncWindow:         Sync Allowed
Sync Policy:        Automated (Prune)
Sync Status:        Synced to main (a5f7d04)
Health Status:      Progressing

GROUP  KIND        NAMESPACE  NAME   STATUS  HEALTH       HOOK  MESSAGE
       Service     demo       nginx  Synced  Healthy            service/nginx created
apps   Deployment  demo       nginx  Synced  Progressing        deployment.apps/nginx created

(⎈|kind-ersia:N/A) root@DESKTOP-O4EPQ9T:~/work/argocd-lab# kubectl -n demo get all
NAME                         READY   STATUS    RESTARTS   AGE
pod/nginx-55d67f7b54-grk56   1/1     Running   0          18s

NAME            TYPE        CLUSTER-IP     EXTERNAL-IP   PORT(S)   AGE
service/nginx   ClusterIP   10.96.70.244   <none>        80/TCP    18s

NAME                    READY   UP-TO-DATE   AVAILABLE   AGE
deployment.apps/nginx   1/1     1            1           18s
Git 저장소에서 commit으로 배포 앱 구성 변경하기
# replicas 1 → 3 변경
sed -i 's/replicas: 1/replicas: 3/' manifests/nginx/deployment.yaml
git commit -am "scale: nginx replicas to 3"
git push

# 모니터링
watch -n 2 "argocd app get nginx-app | sed -n '1,80p'; echo '---'; kubectl -n demo get deploy,pod"ArgoCD Sync 주기: 180초 - How often does Argo CD check for changes to my Git or Helm repository
3분 후 자동으로 구성이 변경되는 것을 확인할 수 있다. (기다리기 귀찮을 경우 ArgoCD에서 Refresh를 한번 수행해주면 된다.)

Git저장소가 아닌 수동으로 변경 후 SelfHeal 테스트
yaml에서 selfHeal을 true로 설정하거나 UI에서 해당 옵션을 켜주면 터미널에서 강제로 변경할 경우 저장소 코드에 맞춰서 자동으로 복구되는 기능이 존재한다.
# 터미널에서 직접 5로 변경
kubectl -n demo scale deploy/nginx --replicas=5

# 변경 후 금방 Argo CD가 다시 replicas=3 으로 복구 (selfHeal)
watch -n 2 "kubectl -n demo get deploy nginx -o jsonpath='{.status.replicas}'"ArgoCD 변경 이력 및 복구 기능
Argo CD는 내부적으로 배포 Revision을 관리하기 때문에 UI나 CLI 명령어로 쉽게 Rollback이 가능하다.
(⎈|kind-ersia:N/A) root@DESKTOP-O4EPQ9T:~/work/argocd-lab# argocd app history nginx-app
{"level":"warning","msg":"Failed to invoke grpc call. Use flag --grpc-web in grpc calls. To avoid this warning message, use flag --grpc-web.","time":"2025-11-09T03:03:07+09:00"}
SOURCE  https://github.com/ErsiaJin/argocd-test.git
ID      DATE                           REVISION
0       2025-11-09 02:53:38 +0900 KST  main (a5f7d04)
1       2025-11-09 02:58:51 +0900 KST  main (33ea243)


# 특정 ID로 Rollback하기
argocd app rollback nginx-app 0
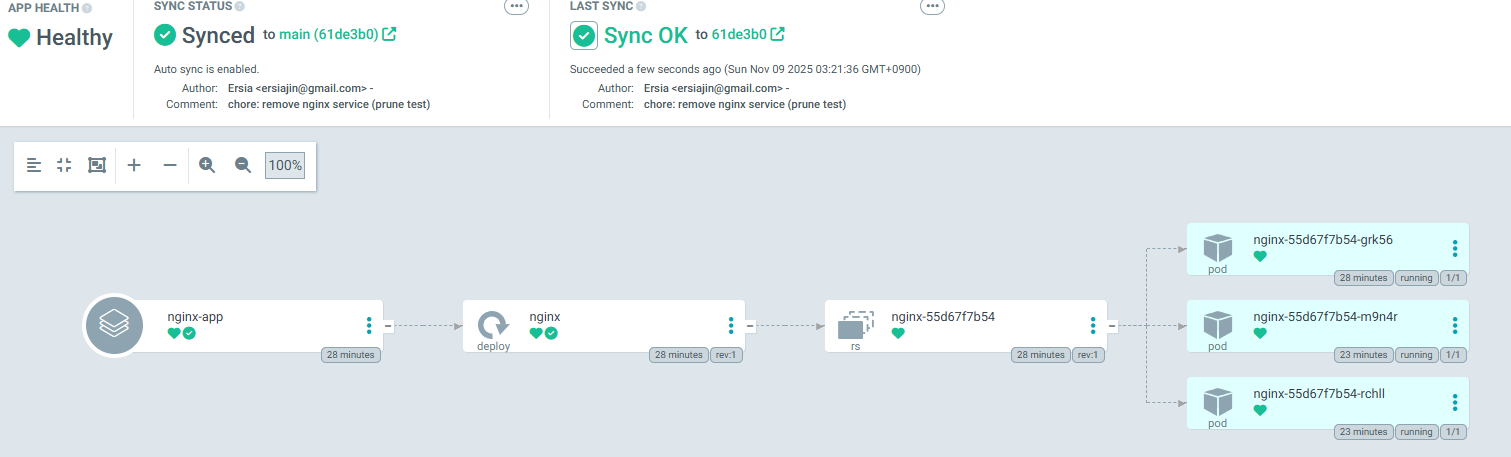
Git 저장소에서 배포한 앱 삭제
yaml 배포 시 prune 옵션을 true로 배포하거나 UI에서 활성화 해주면
ArgoCD에서 자동 배포와 마찬가지로 Git 저장소에서 삭제하면 자동으로 삭제할 수 있다.
git rm manifests/nginx/service.yaml
git commit -m "chore: remove nginx service (prune test)"
git push
Sync Hooks & Waves — 배포 순서와 검증 흐름 제어 (by ChatGPT)
ArgoCD에서 Git 기반 배포 시, 특정 리소스를 먼저/나중에 적용하도록 제어하거나
배포 전후 실행(Job 등)으로 검증, 마이그레이션 등을 자동화할 수 있다.
- PreSync : 배포 전 DB 마이그레이션, 초기 검증 등
- Sync : 리소스 적용 중 실제 Deployment/Service 생성
- PostSync : 배포 후 Smoke test, 알림, 정리 작업 등
annotations 통해 제어할 수 있다.
# 아래와 같은식의 Wave로 구성 가능
# Wave 0: PreSync Job
# Wave 1: ConfigMap
# Wave 2: Deployment
# Wave 3: Service
  annotations:
    argocd.argoproj.io/hook: PreSync
    argocd.argoproj.io/hook-delete-policy: HookSucceeded
    argocd.argoproj.io/sync-wave: "0"
이전에 작업한 nginx를 초기화 하고 진행한다.
# 이전 nginx manifest 정리
cd ~/work/argocd-lab
git rm -r manifests/nginx || true
mkdir -p manifests/nginx(1) PreSync Hook (Wave 0) – 마이그레이션 더미 Job
cat <<'EOF' > manifests/nginx/00-presync-job.yaml
apiVersion: batch/v1
kind: Job
metadata:
  name: pre-migrate
  namespace: demo
  annotations:
    argocd.argoproj.io/hook: PreSync
    argocd.argoproj.io/hook-delete-policy: HookSucceeded
    argocd.argoproj.io/sync-wave: "0"
spec:
  template:
    spec:
      restartPolicy: Never
      containers:
      - name: migrate
        image: alpine:3.20
        command: ["sh","-c","echo '[PreSync] DB migrate...'; sleep 2; echo 'Done'"]
EOF(2) ConfigMap (Wave 1) – 앱이 참조할 설정
cat <<'EOF' > manifests/nginx/10-configmap.yaml
apiVersion: v1
kind: ConfigMap
metadata:
  name: nginx-config
  namespace: demo
  annotations:
    argocd.argoproj.io/sync-wave: "1"
data:
  WELCOME_MESSAGE: "Hello from ConfigMap (Wave 1)"
EOF(3) Deployment (Wave 2) – ConfigMap을 참조하는 nginx
cat <<'EOF' > manifests/nginx/20-deployment.yaml
apiVersion: apps/v1
kind: Deployment
metadata:
  name: nginx
  namespace: demo
  labels:
    app: nginx
  annotations:
    argocd.argoproj.io/sync-wave: "2"
spec:
  replicas: 2
  selector:
    matchLabels: { app: nginx }
  template:
    metadata:
      labels: { app: nginx }
    spec:
      containers:
      - name: nginx
        image: nginx:1.25
        ports:
        - containerPort: 80
        env:
        - name: WELCOME_MESSAGE
          valueFrom:
            configMapKeyRef:
              name: nginx-config
              key: WELCOME_MESSAGE
EOF(4) Service (Wave 3)
cat <<'EOF' > manifests/nginx/30-service.yaml
apiVersion: v1
kind: Service
metadata:
  name: nginx
  namespace: demo
  annotations:
    argocd.argoproj.io/sync-wave: "3"
spec:
  type: ClusterIP
  selector:
    app: nginx
  ports:
  - name: http
    port: 80
    targetPort: 80
EOF(5) PostSync Hook (Wave 4) – 스모크 테스트
cat <<'EOF' > manifests/nginx/90-postsync-job.yaml
apiVersion: batch/v1
kind: Job
metadata:
  name: smoke-test
  namespace: demo
  annotations:
    argocd.argoproj.io/hook: PostSync
    argocd.argoproj.io/hook-delete-policy: HookSucceeded
    argocd.argoproj.io/sync-wave: "4"
spec:
  template:
    spec:
      restartPolicy: Never
      containers:
      - name: test
        image: curlimages/curl:8.8.0
        command:
          - sh
          - -c
          - |
            echo "[PostSync] smoke test to nginx service..."
            # Cluster DNS로 접근 (서비스 DNS: nginx.demo.svc.cluster.local)
            curl -sI http://nginx.demo.svc.cluster.local | head -n 1 || true
            echo "[PostSync] done"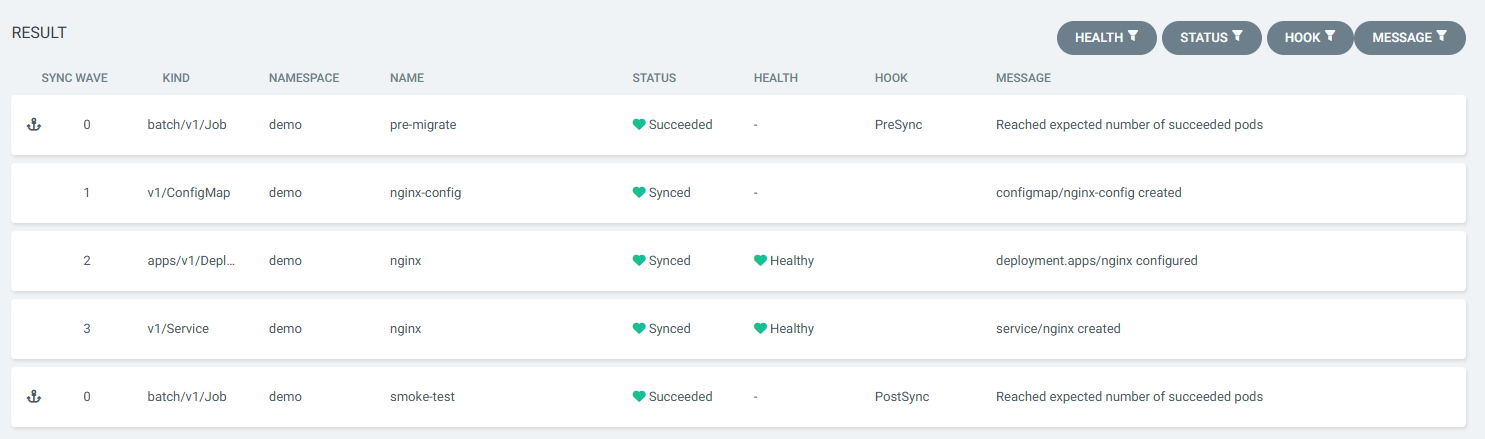
EOF위의 내용을 한번에 Commit 후 동기화 흐름 모니터링
git add manifests/nginx
git commit -m "feat: single example for Hooks+Waves (PreSync->W1->W2->W3->PostSync)"
git push
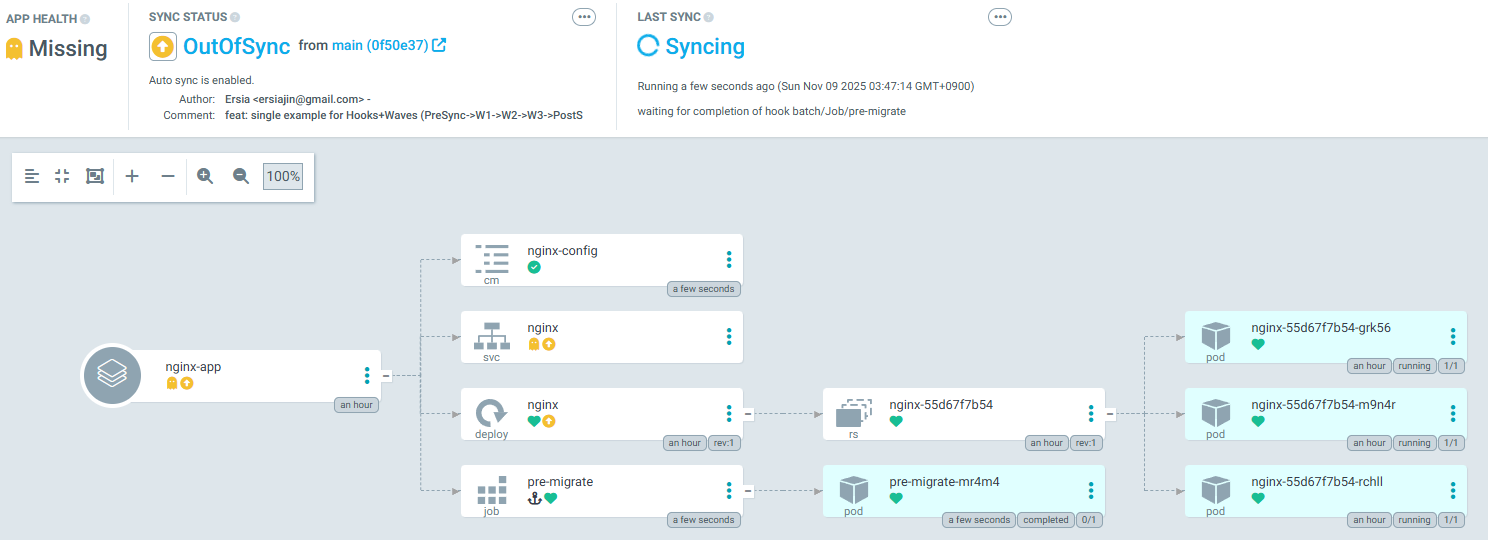
아래와 같이 배포 이력을 확인해보면 PreSync, Wave흐름, PostSync의 동작을 확인할 수 있다.
- PrePreSync Job 실행 → 성공
- Wave 1: ConfigMap
- Wave 2: Deployment(Replica 2)
- Wave 3: Service
- PostSync Job 실행 → 성공
만약 실패에 대한 Hook도 추가하려면 아래의 코드를 추가하면 된다.
cat <<'EOF' > manifests/nginx/05-presync-fail.yaml
apiVersion: batch/v1
kind: Job
metadata:
  name: pre-fail
  namespace: demo
  annotations:
    argocd.argoproj.io/hook: PreSync
    argocd.argoproj.io/hook-delete-policy: HookFailed
    argocd.argoproj.io/sync-wave: "0"
spec:
  template:
    spec:
      restartPolicy: Never
      containers:
      - name: fail
        image: alpine:3.20
        command: ["sh","-c","echo '[PreSync] fail intentionally'; exit 1"]
EOF

git add manifests/nginx/05-presync-fail.yaml
git commit -m "test: add failing PreSync hook (intentional)"
git push